Getting started with AWS and Terraform
In the day job I was tasked with provisioning an Amazon Elastic Container Registry and an Amazon DynamoDB using Terraform. All these words were alien to me and it was difficult to know where to start.
I was working in a codebase that already provisioned its infrastructure via Terraform and GitHub Actions so at least I had something to reference. However, it turned out for me that was not the best place to start, there was too much configuration in there for my brain to initially grasp what was going on. As is often the case though I stared at it for a long time and with the help of a colleague I muddled through and eventually managed to provision an Amazon Elastic Container Registry without really understanding anything.
What I should have done initially is set up my own AWS account and worked through some examples where it was easier to try things out without any concern for breaking things in a company environment. And that is exactly what I did after the initial pain of muddling through.
Assuming you are already set up and need a reminder of the commands…
$ terraform init
$ terraform fmt
$ terraform validate
$ terraform plan
Technology
Just a quick primer on some of the technologies used here as some of them I was not aware of at all.
AWS
It is hard not to be aware of AWS but I have rarely had the need to use it as developer. Generally dev ops teams look after such things and I never had to go near it. I guess often it depends on company/team sizes as to whether you get much exposure to certain technologies.
Amazon Elastic Container Registry
A service that stores, manages and deploys Docker Images.
Push container images to Amazon ECR without installing or scaling infrastructure, and pull images using any management tool.
AWS ECR
Terraform
In short, Terraform provides infrastructure automation. It allows you to codify and version control your infrastructure and abstract away complex command line instructions to a cloud provider for example.
Deliver infrastructure as code. Terraform codifies cloud APIs into declarative configuration files.
Terraform
Where to begin?
I had to do a lot of reading first to get an overview of the above technologies before I started diving in. Eventually I settled on starting with this terraform tutorial.
First I set up my own AWS account. There is a lot to learn here around setting up users, groups and permissions but for the purposes of this post we will assume you have an AWS account setup and running and you have your IAM credentials.
Now we need to ensure we have the AWS CLI and Terraform CLI installed locally.
Configure AWS CLI
In order for Terraform to provision infrastructure on AWS you need to configure AWS via the CLI.
$ aws configureYou will be prompted for your credentials. See the quick start for more details.
Provision an Amazon DynamoDB
First create a new directory for your terraform test and cd into it.
$ mkdir terraform-test && "$_"Then create a terraform file. Terraform files have a .tf file extension.
➜  terraform-test
$ touch main.tf
Now we can add configuration to main.tf.
Terraform block
First we start with the terraform{} block.
terraform {
  required_version = ">= 1.3.1"
  required_providers {
    aws = {
      version = "~> 4.34.0"
    }
  }
}
required_version
Use the
Manage Terraform Versionsrequired_versionsetting to control when you upgrade the version of Terraform that you use for your Terraform projects to make updates more predictable.
required_providers
Each Terraform module must declare which providers it requires, so that Terraform can install and use them. Provider requirements are declared in a required_providers block.
Requiring Providers
Provider block
Here we specify that the provider is aws. Providers can be found in the Terraform Registry. We can look up the AWS Provider in the registry in order to configure it.
We specify the region so that any infrastructure we provision will be deployed to that region.
provider "aws" {
  region = "eu-west-2"
}
Providers allow Terraform to interact with cloud providers, SaaS providers, and other APIs.
Provider Configuration
Resource block
Resource blocks define the components of your infrastructure. They are composed of 2 strings which make up the resource type and the resource name.
Here we define a resource type of aws_dynamodb_table. You can find this resource in the registry. The resource name is something you specify yourself. Here we use test_table as the name.
The resource type and name combine to form a unique id, in this case it will be aws_dynamodb_table.test_table.
resource "aws_dynamodb_table" "test_table" {}Again we can check the registry in order to see what is required to configure the resource. Below I have modified the example in the registry so we have a very simple configuration that we can use to test provisioning.
For now we won’t gon into the details of the configuration here so we can concentrate on provisioning the infrastructure via Terraform CLI.
resource "aws_dynamodb_table" "test_table" {
  name           = "TestTable"
  billing_mode   = "PROVISIONED"
  read_capacity  = 5
  write_capacity = 5
  hash_key       = "client_id"
  range_key      = "title"

  attribute {
    name = "client_id"
    type = "S"
  }

  attribute {
    name = "title"
    type = "S"
  }
}
The final config
Putting it all together we have the following configuration in main.tf to provision an Amazon DynamoDB on AWS.
terraform {
  required_version = ">= 1.3.1"
  required_providers {
    aws = {
      version = "~> 4.34.0"
    }
  }
}

provider "aws" {
  region = "eu-west-2"
}

resource "aws_dynamodb_table" "test_table" {
  name           = "TestTable"
  billing_mode   = "PROVISIONED"
  read_capacity  = 5
  write_capacity = 5
  hash_key       = "client_id"
  range_key      = "title"

  attribute {
    name = "client_id"
    type = "S"
  }

  attribute {
    name = "title"
    type = "S"
  }
}
Terraform CLI
Assuming you have installed the Terraform CLI then we can do the following.
Initialise
Initialise the directory.
➜  terraform-test
$ terraform init
Initializing a configuration directory downloads and installs the providers defined in the configuration, which in this case is the aws provider.
Initialise
Format and Validate
Format and validate our configuration.
➜  terraform-test
$ terraform fmt
You will be notified if there are any issues with validation and informed when the configuration is valid.
➜  terraform-test
$ terraform validate
Success! The configuration is valid.
We recommend using consistent formatting in all of your configuration files. The terraform
Format and validate the configurationfmtcommand automatically updates configurations in the current directory for readability and consistency. You can also make sure your configuration is syntactically valid and internally consistent by using the terraformvalidatecommand.
Apply configuration
Applying the configuration.
➜  terraform-test
$ terraform apply
At this point Terraform outputs an execution plan.
Terraform used the selected providers to generate the following execution plan.
Resource actions are indicated with the following symbols:
  + create

Terraform will perform the following actions:

  # aws_dynamodb_table.test_table will be created
  + resource "aws_dynamodb_table" "test_table" {
      + arn              = (known after apply)
      + billing_mode     = "PROVISIONED"
      + hash_key         = "client_id"
      + id               = (known after apply)
      + name             = "TestTable"
      + range_key        = "title"
      + read_capacity    = 5
      + stream_arn       = (known after apply)
      + stream_label     = (known after apply)
      + stream_view_type = (known after apply)
      + tags_all         = (known after apply)
      + write_capacity   = 5

      + attribute {
          + name = "client_id"
          + type = "S"
        }
      + attribute {
          + name = "title"
          + type = "S"
        }

      + point_in_time_recovery {
          + enabled = (known after apply)
        }

      + server_side_encryption {
          + enabled     = (known after apply)
          + kms_key_arn = (known after apply)
        }

      + ttl {
          + attribute_name = (known after apply)
          + enabled        = (known after apply)
        }
    }

Plan: 1 to add, 0 to change, 0 to destroy.

Do you want to perform these actions?
  Terraform will perform the actions described above.
  Only 'yes' will be accepted to approve.

  Enter a value:
Enter yes to apply the plan and create your infrastructure. Terraform outputs the details upon completion.
aws_dynamodb_table.test_table: Creating...
aws_dynamodb_table.test_table: Creation complete after 7s [id=TestTable]
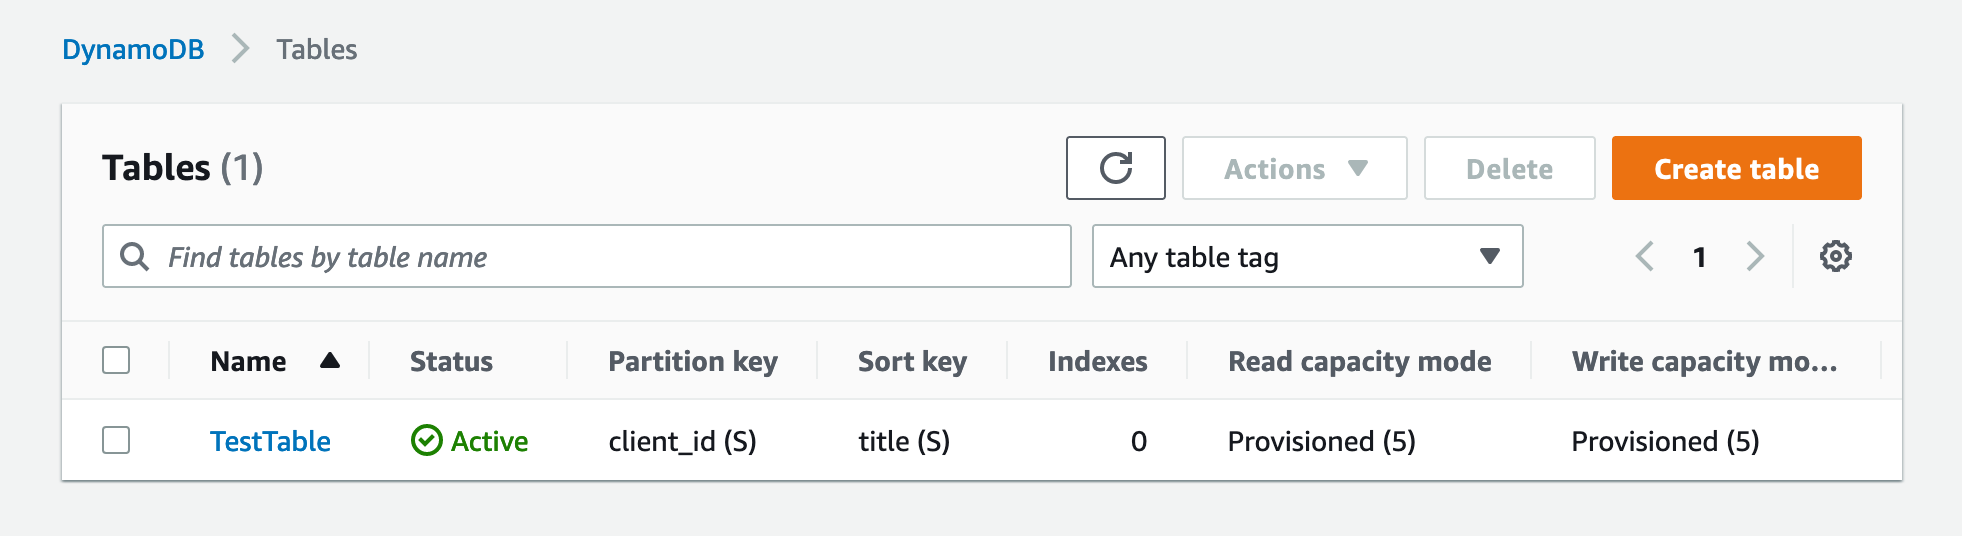
Apply complete! Resources: 1 added, 0 changed, 0 destroyed.The DynamoDB has now been provisioned, you can validate this by logging into your AWS account and navigating to DynamoDB dashboard via Services. Select Tables to see the description of your table. If you don’t see it, ensure you have selected the correct region from the regions dropdown (the region that you specified in main.tf).
What next?
This has just scratched the surface of what can be achieved using Terraform. For example we could provision an Elastic Container Registry, an AWS DynamoDB and an S3 bucket to provide infrastructure for an application. We could then use GitHUb Actions to add Terraform to a CI pipeline and automate all of the above terraform commands.
Other things to note
It is worth listing all the files in your directory as you will see Terraform has created a few things.
➜  terraform-test
.terraform
.terraform.lock.hcl
main.tf
terraform.tfstate
terraform.tfstate.backup
.terraform is directory where the providers have been download to.
➜  .terraform tree
.
└── providers
    └── registry.terraform.io
        └── hashicorp
            └── aws
                └── 4.34.0
                    └── darwin_amd64
                        └── terraform-provider-aws_v4.34.0_x5
There is also a state file created by Terraform - terraform.tfstate. This file is used for subsequent updates to your configuration.
If you were to run terraform apply again without any changes Terraform uses the state file to determine nothing has changed e.g.
➜  terraform-test
$ terraform apply
aws_dynamodb_table.test_table: Refreshing state... [id=TestTable]

No changes. Your infrastructure matches the configuration.

Terraform has compared your real infrastructure against your configuration and found no differences, so no changes are needed.
If we modify main.tf in any way then Terraform will compare this against the state file and output the execution plan again when you run terraform apply.