Syntax highlighting with Shiki
I have been using Prism for syntax highlighting on this site but decided to take a look at Shiki because their strapline says it is A beautiful yet powerful syntax highlighter.
console.log('I agree, it is a beautiful yet powerful syntax highlighter');The current incarnation of this site is built with Sveltekit and mdsvex, a joyful combination! Adding Shiki was a breeze as the mdsvex docs show you how to configure it. And what better way to see how it looks than using it right here to outline the steps.
Install Shiki
npm install -D shikiConfigure mdsvex
This is my mdsvex.config.js before modifying for using Shiki.
import { defineMDSveXConfig as defineConfig } from 'mdsvex';
const config = defineConfig({
extensions: ['.svelte.md', '.md', '.svx'],
smartypants: {
dashes: 'oldschool'
},
remarkPlugins: [],
rehypePlugins: [],
layout: './src/routes/posts/+layout.svelte'
});
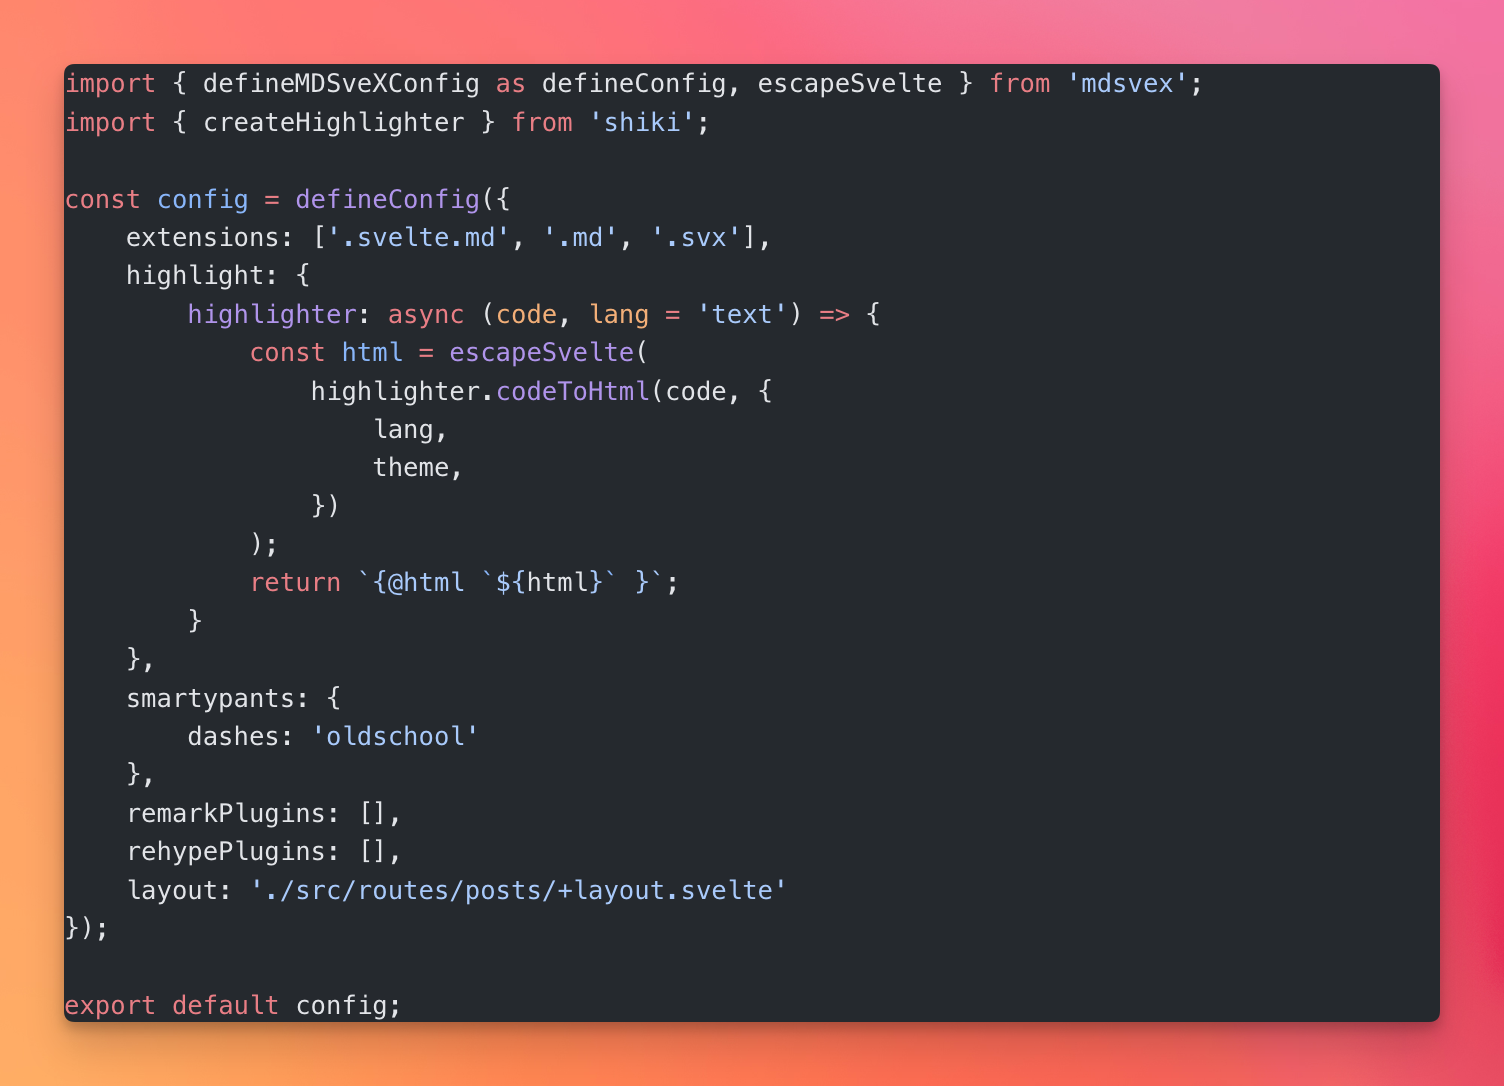
export default config;The mdsvex docs example defines options as a separate const. I have chosen in the first instance to add directly to what I already have.
import { defineMDSveXConfig as defineConfig, escapeSvelte } from 'mdsvex';
import { createHighlighter } from 'shiki';

const theme = 'github-dark';
const highlighter = await createHighlighter({
    themes: [theme],
    langs: [ 'javascript', 'typescript' ]
});

const config = defineConfig({
    extensions: ['.svelte.md', '.md', '.svx'],
    highlight: {
        highlighter: async (code, lang = 'text') => {
            const html = escapeSvelte(
                highlighter.codeToHtml(code, {
                    lang,
                    theme,
                })
            );
            return `{@html `${html}` }`;
        }
    },
    smartypants: {
        dashes: 'oldschool'
    },
    remarkPlugins: [],
    rehypePlugins: [],
    layout: './src/routes/posts/+layout.svelte'
});

export default config;
And that is it, done! Well not quite but you get an awful lot for free here.
Additional styles
By default we get inline styles which gives us the syntax highlighting that we want. However, the containing element has no padding and the line-height is compact. The image below shows the styling we get ‘out of the box’. Still amazing but we just need a little more styling to provide some space, just like the all the code block examples on this page which have some padding and an increased line-height.
Generated markup
Let’s have a look at the markup generated by Shiki using this example json code block.
{
	"fruit": "Apple",
	"size": "Large",
	"color": "Red"
}
In the generated markup we can see that there is class of shiki added to the <pre> element and a class="line" on those span elements that represent a line.
<pre class="shiki github-dark" style="background-color:#24292e;color:#e1e4e8" tabindex="0">
    <code>
        <span class="line">
            <span style="color:#E1E4E8">{</span>
        </span>
        <span class="line">
            <span style="color:#79B8FF">"fruit"</span>
            <span style="color:#E1E4E8">: </span>
            <span style="color:#9ECBFF">"Apple"</span>
            <span style="color:#E1E4E8">,</span>
        </span>
        <span class="line">
            <span style="color:#79B8FF">"size"</span>
            <span style="color:#E1E4E8">: </span>
            <span style="color:#9ECBFF">"Large"</span>
            <span style="color:#E1E4E8">,</span>
        </span>
        <span class="line">
            <span style="color:#79B8FF">"color"</span>
            <span style="color:#E1E4E8">: </span>
            <span style="color:#9ECBFF">"Red"</span>
        </span>
        <span class="line">
            <span style="color:#E1E4E8">}</span>
        </span>
    </code>
</pre>
Styles
We can hook into these classes where appropriate in the codebase. In my case I opted to have a separate file just for these styles, syntax-highlighter.css Here I add some padding to the containing element and adjust the line height.
.shiki {
	padding: 1rem;
	overflow: scroll;
	border-radius: 4px;
}

.shiki .line {
	line-height: 2;
}
So with only a few additions to CSS you have a very clean and professional looking syntax highlighting setup for very little effort. We have merely scratched the surface here, see the docs for all the fun you can have.
Note that there are other customisations in the code blocks here such as line numbers and line highlighting which are not covered here.